Learn how to display different content based on the user’s selection in a form.
What are conditional responses?
Conditional responses allow you to display different content after filling out a form, depending on what the user selected. This enables you to personalize messages, instructions, and next steps.
Example: If the user selects “invoices,” they will see information about VAT invoices. If they select “receipts,” they will see information about receipts.
How to configure this?
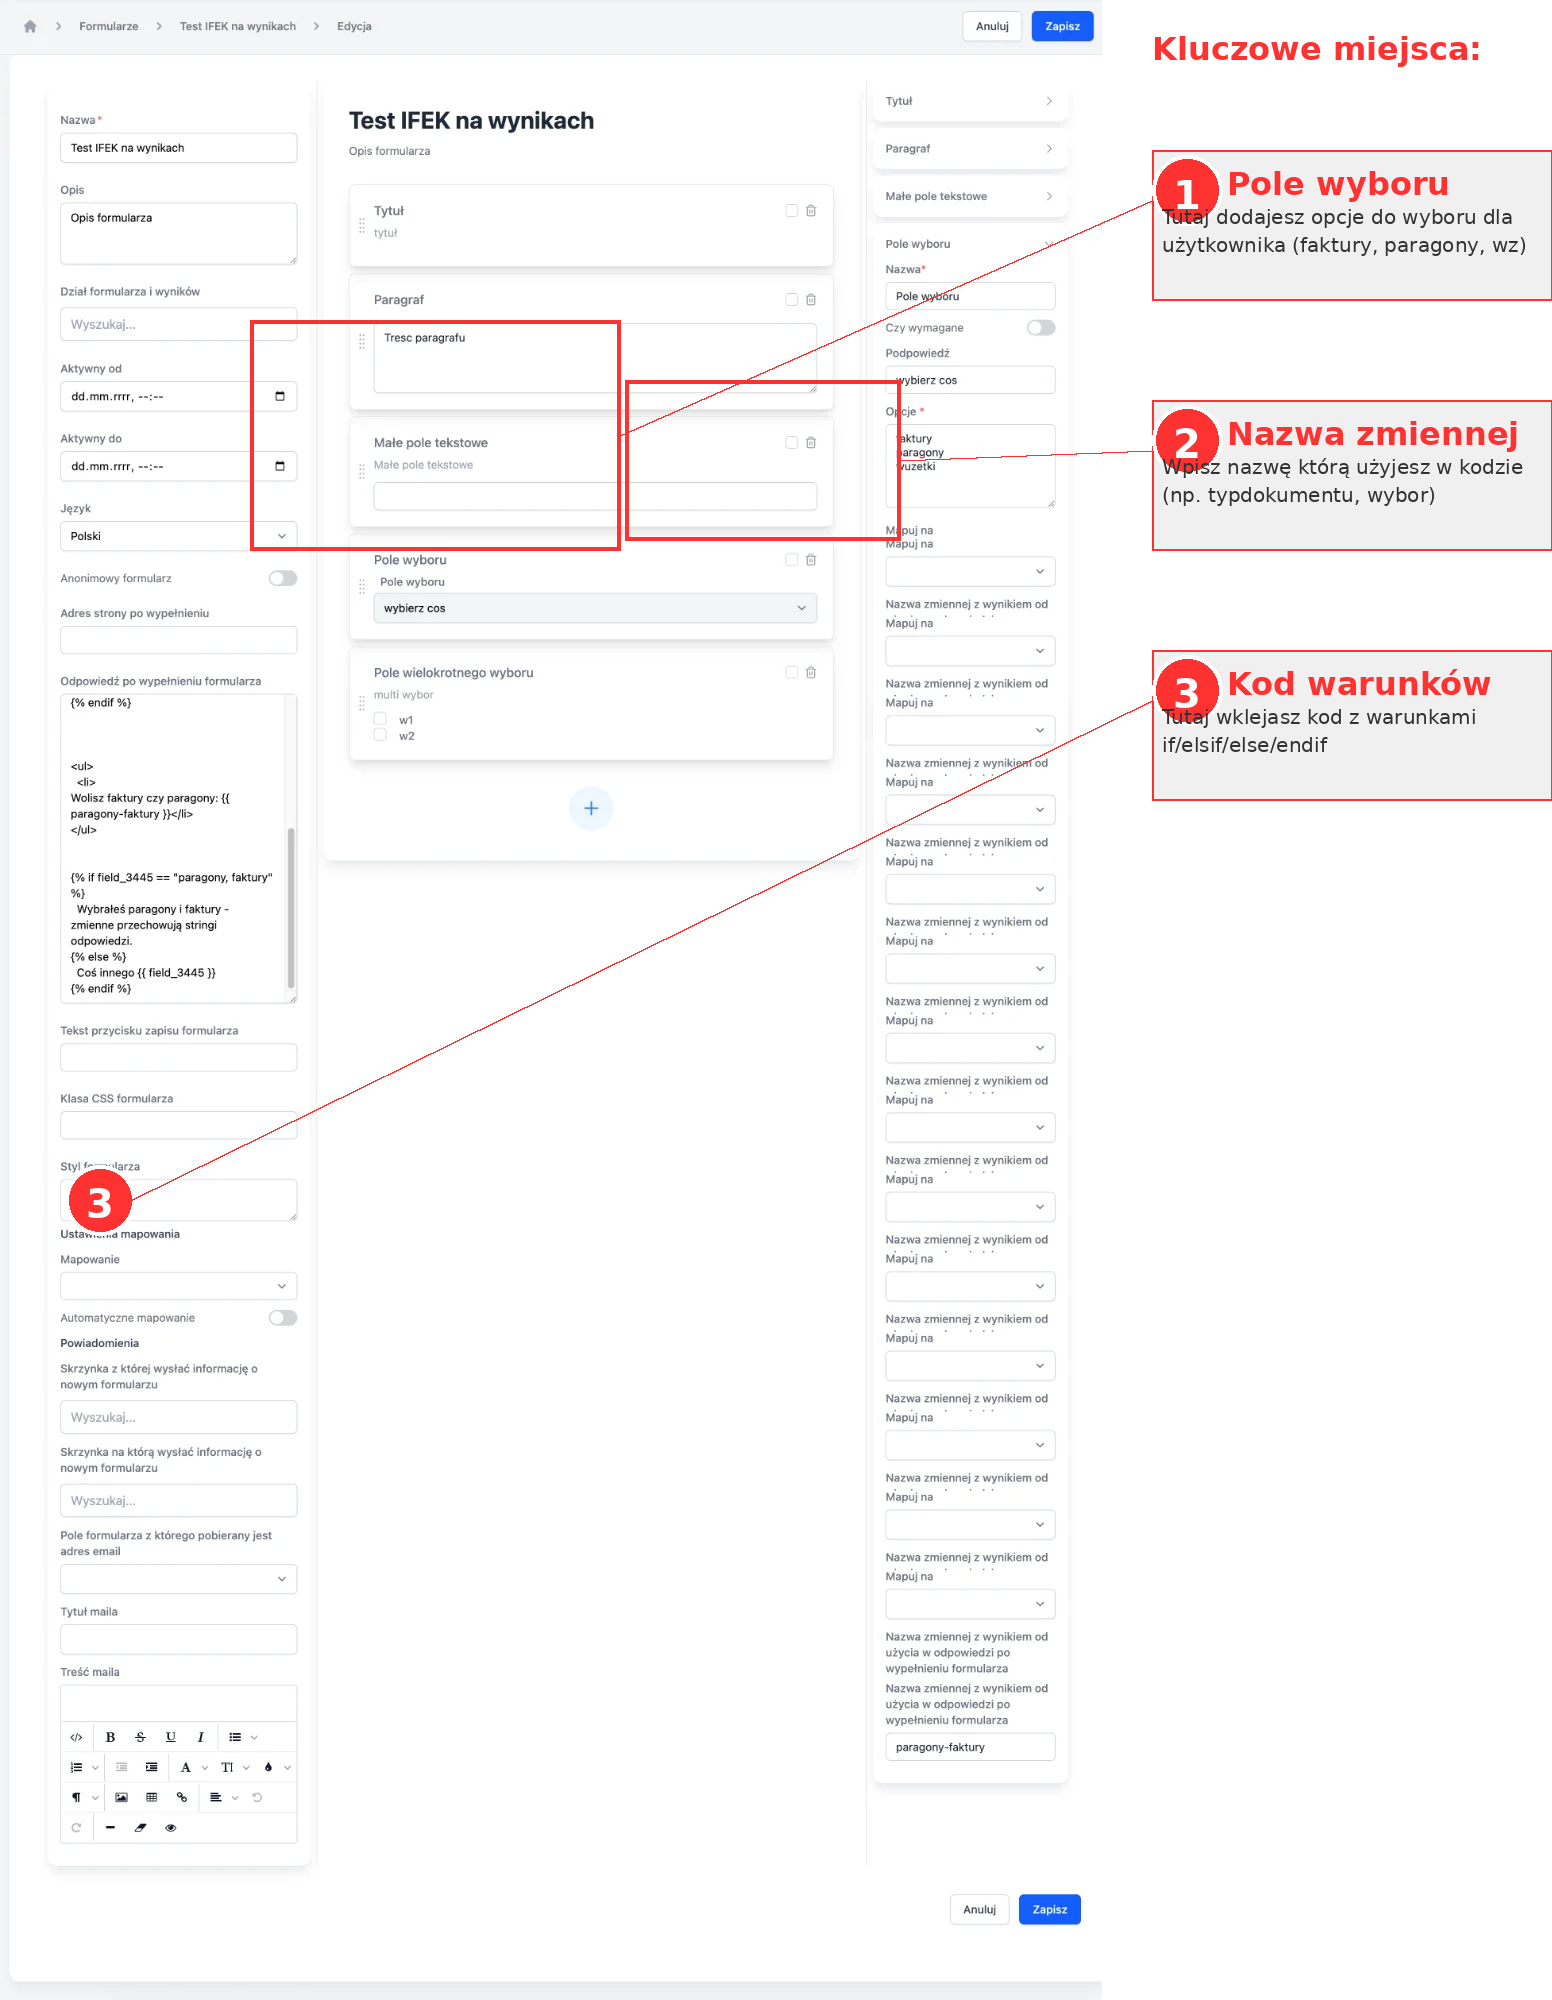
Step 1: Create a selection field
- Open the form editor
- Add a field of type:
- Select field (select/dropdown) - for single selection
- Multiple choice field (checkboxes) - for multiple options
- Add options, e.g.:
invoices,receipts,WZ
Step 2: Assign a variable name
In the right panel, in the field settings, find:
“Variable name to map to”
Enter a readable name (without spaces and hyphens), e.g:
documentTypepaymentMethodoptionSelection
💡 Tip: Use only letters, numbers, and underscores.
Step 3: Add conditional code
Scroll to the bottom of the form and find the field:
“Response after form submission (% endif %)”
Paste the code with conditions (see examples below).
Examples
Example 1: Simple selection (select)
Configuration:
- Field: Select
- Options:
invoices,receipts,WZ - Variable name:
documentType
Code to paste:
<h2>Thank you for filling out the form!</h2>

{% if documentType == "invoices" %}
  <p><strong>VAT Invoices</strong></p>
  <p>Invoices will be issued automatically and sent to your email address.</p>

{% elsif documentType == "receipts" %}
  <p><strong>Receipts</strong></p>
  <p>Receipts will be available for download in your client panel.</p>

{% elsif documentType == "WZ" %}
  <p><strong>WZ Documents</strong></p>
  <p>Warehouse documents will be attached to each shipment.</p>

{% else %}
  <p>No option selected.</p>
{% endif %}
Example 2: Multiple options (checkboxes)
Configuration:
- Field: Multiple choice field
- Options:
invoices,receipts,WZ - Variable name:
documents
Code to paste:
<h2>Your preferences</h2>

<p>You selected: <strong>{{ documents }}</strong></p>

{% if documents == "invoices, receipts" or documents == "receipts, invoices" %}
  <p>We will prepare documents in both formats.</p>

{% elsif documents == "invoices" %}
  <p>We will only issue VAT invoices.</p>

{% elsif documents == "receipts" %}
  <p>We will only issue receipts.</p>

{% else %}
  <p>We will contact you regarding documentation.</p>
{% endif %}
⚠️ Note: For checkboxes, check different order of selections using or.
Syntax
Displaying values
{{ variableName }}
Displays the value selected by the user.
Conditions
{% if variableName == "value" %}
  <p>Content when condition is met</p>
{% elsif variableName == "another_value" %}
  <p>Content for another value</p>
{% else %}
  <p>Default content</p>
{% endif %}
⚠️ Important: Use {% elsif %} not {% elif %}
Operators
-
==- equal -
!=- not equal -
and- and (both conditions must be met) -
or- or (at least one condition)
Example with operators:
{% if document == "invoices" and payment == "transfer" %}
  <p>The invoice will be sent after the transfer is credited.</p>
{% endif %}
Common issues
Condition not working
Cause: The variable name in the code differs from the name in the “Map to” field.
Solution: Check if the variable name is identical (case-sensitive).
Only “else” shows for checkboxes
Cause: Different order of option selections not considered.
Solution: Use or to check both orders:
{% if variable == "option1, option2" or variable == "option2, option1" %}
Syntax error
Cause: Used {% elif %} instead of {% elsif %}
Solution: Always use {% elsif %} (with the letter “s”)
Values do not match
Cause: Differences in case or spaces.
Solution:
-
"Invoices"≠"invoices"(case matters) -
"invoices, receipts"≠"invoices,receipts"(space after the comma)
Debugging
If you are unsure what exact value is in the variable, add at the beginning:
<p>DEBUG: {{ variableName }}</p>
Fill out the form and see the displayed value. Then remove this line.
Best practices
✅ Use readable variable names: documentType instead of td
✅ Avoid hyphens in names: document_type instead of document-type
✅ For checkboxes, check different orders using or
✅ Close every condition: each {% if %} requires {% endif %}
✅ Test before publishing: fill out the form for testing and check all possible selections
Summary
- Add a selection field to the form
- Assign a variable name in “Map to”
- Add conditional code in “Response after form submission”
- Use syntax
{% if %},{% elsif %},{% else %},{% endif %} - Test all possible variants
Email templates (template:)
Liquid conditions can also be used to send different emails depending on the selection. In the “Confirmation content” field, you enter:
{% if subject == "Inquiry about an offer" %}template:1 Questions > Offer{% endif %}
{% if subject == "Account deletion" %}template:1 Questions > Account deletion{% endif %}
More: Automatic email replies from forms
Related articles: